ODIExperts.com

The blog for Oracle Data Integrator ( ODI )

September 21, 2009
by kdevendr
3 Comments

Categories: Knowledge Modules , ODI , Reports , Tips and Tricks

Single Post View


Report of list of KMs in each Interface

This query lists all the KMs used in each Interfaces under a particular Folder or Project with Interface  Name , Interface Type ie. Permanent_Interface (Blue) or Temporary_Interface (Yellow) ,LKM , IKM , CKM and Source Set Number since there can be multiple Sources feeding a single target in an Interface.

SELECT SP.pop_name AS INTERFACE_NAME ,
CASE WHEN SP.WSTAGE=’E’ THEN ‘TEMP_INTERFACE’
ELSE ‘PERM_INTERFACE’
END AS INTERFACE_TYPE,
NVL(STL.trt_name,’None’) AS LKM_USED ,
NVL(STI.trt_name,’None’) AS IKM_USED ,
NVL(SSS.src_set_name,’None’) AS INPUT_SET_NAME ,
NVL(STC.TRT_NAME,’NONE’) AS CKM_USED
FROM snp_pop SP
LEFT OUTER JOIN snp_src_set SSS
ON SP.i_pop = SSS.i_pop
LEFT OUTER JOIN snp_trt STL
ON SSS.i_trt_klm = STL.i_trt
LEFT OUTER JOIN snp_folder SF
ON SP.i_folder = SF.i_folder
LEFT OUTER JOIN snp_trt STI
ON STI.i_trt = SP.i_trt_kim
LEFT OUTER JOIN SNP_TRT STC
ON stc.i_trt = SP.I_TRT_KCM
LEFT OUTER JOIN snp_project SPJ
ON SPJ.i_project = SF.i_project
WHERE SF.folder_name = ‘<FOLDER_NAME>’
AND spj.project_name = ‘<PROJECT_NAME>’
ORDER BY SP.pop_name, SSS.src_set_name;

Sample Output

image

September 21, 2009
by kdevendr
9 Comments

Categories: ODI , Technology

Single Post View


Connecting openLDAP

In Hyperion EPM 11 , authentication information is stored in openLDAP .

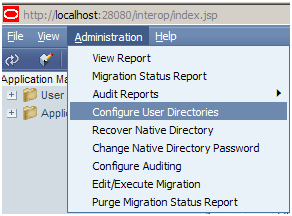
To get more information for the Hostname , port name , log into your Hyperion Shared Service console and under ‘ Administration ‘ click on ‘ Configure User Directories

Configure User Directories

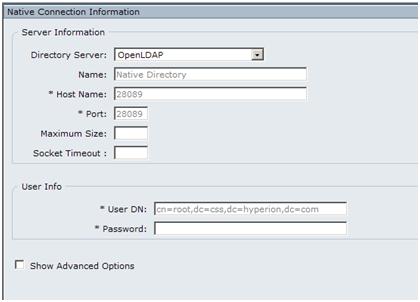
Provider Configuration

Click ‘ Edit ‘ on the ‘ Provider Configuration‘ and check for the other details required for setting up the connection for openLDAP in ODI

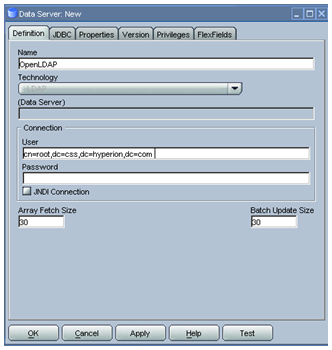
Right click on LDAP Technology and ‘ Insert Data Server ‘ and for User -enter the above ‘user DN – ‘ cn=root,dc=css,dc=hyperion,dc=com

Here cn=root , the main root user who have all privilege to read all the data from OpenLDAP .

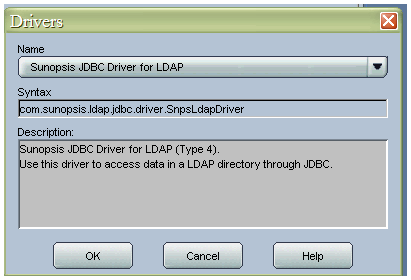
Select the Sunopsis JDBC Driver for LDAP

JDBC URL –

jdbc:snps:ldap?ldap_url=ldap://<host>:<port>/&ldap_basedn=<base_dn>[&<property>=<value>…]

jdbc:snps:ldap?ldap_url=ldap://localhost:28089/&ldap_password=KLLEJMNLKFLBKLKODDGPGPDB&ldap_basedn=dc=css,dc=hyperion,dc=com

<host>: LDAP server network name or IP address. – < localhost >

<port>: port number the LDAP server is listening on. < 28089 >

<base_dn>: base DN to connect to. < dc=css,dc=hyperion,dc=com >

Encode the password using this command

The Default Password for OpenLDAP is ” security

To encode the password , run this command

java -cp E:OraHome_1oracledidriverssnpsldapo.jar com.sunopsis.ldap.jdbc.driver.SnpsLdapEncoder <enter password here>

If your password is not changed and also the User DN is same then you can use this JDBC url ,just change the localhost to your hostname

jdbc:snps:ldap?ldap_url=ldap://localhost:28089/&ldap_password=KLLEJMNLKFLBKLKODDGPGPDB&ldap_basedn=dc=css,dc=hyperion,dc=com

September 20, 2009
by Cezar Santos
9 Comments

Categories: Architecture , Logic , ODI , Tips and Tricks

Tags: , , , ,

Single Post View


How to call a Web Service that start an ODI Scenario and waits its complete execution

Hi friends,

I just created this technique because I was in a POC (Prove of Concept) and needed to call a WS (Web Service) but the WS must wait the scenario execution until the end and, too, receives a return (OK or Not OK).

As is from common knowledge , calls the ODI web service for scenario execution only starts a scenario but doesn’t “wait” the scenario execution. The response just indicates that the process was started, not if it finish with or without error.

This behavior is absolutely normal once a scenario could take hours to finish and WS aren’t done for that.

However, as a programmer, it ‘s always good to break the rules!

What I’m about to show is very simple and easy. The technique was designed to work with Oracle.

Recipe:

Ingredients
 
1 ODI scenario (from any developed process)
1 Oracle Database with the following packages compiled :
 http://www.oracle.com/technology/tech/java/jsp/pdf/calling_shell_commands_from_plsql_1.1.pdf
1 “Temporary” table created just for be called for a WS . This table should have the same number of columns as the ODI scenario parameters or at least one column of any datatype if the scenario doesn’t receive parameters.
1 Trigger in the temporary table


How to do:
1º) Publish a web service to insert data into this temporary table (Called  Temp_Table from now forward)
You can do that from ODI using a SKM (Service knowledge Module)
2º) Be sure about to have followed all instructions from Oracle document (link at ingredients)
3º) Create a trigger on Temp_Table like:


create or replace TRIGGER Staging_Area.TG_WS
BEFORE INSERT ON ODISA.TEMP_TABLE
FOR EACH ROW
DECLARE
  
   v_Ret varchar2(500);
BEGIN
      v_Ret := os_command.exec(‘startscen ANY_SCENARIO 001 MY_CONTEXT -v=3 -NAME=Agent_Windows MY_PROJECT.vParameter1=’||:new.MY_TEMP_TABLE_COLUMN1 ||’ MY_PROJECT.vParameter2=’||:new.MY_TEMP_TABLE_COLUMN2;
 
      if v_Ret<> ‘0’ then  /* zero is the return code for OK */
         RAISE_APPLICATION_ERROR(‘-20001’, ‘ ODI Error : ‘||v_Ret, FALSE);
      end if;
      
END;
4º )  MIX EVERYTHING and call the WS.
The PL/SQL code at trigger will execute the scenario and waits for a response if the ODI scenario finish with or without error.

Well my friends, here we have a way to start a scenario from WS and got a OK or KO return. Keep in mind that it is a trick to add a characteristic doesn’t present at ODI in the current version.

See you around!

Cezar Santos

September 13, 2009
by kdevendr
2 Comments

Categories: Logic , ODI , Tips and Tricks

Single Post View


Processing multiple Interface through single Package

The Steps are as follows

1. Get the File list into the  ODI Procedure ( ‘ GENERATING LIST OF SCENARIO ’)
2. Assign the Loop to Zero ( LOOP=0)
3. Get the Next Scenario of the Interface  to be processed
4. Process the Scenarios using  ‘ ODISTARTSCENARIO ‘  by passing the value from #GET_SCENARIO  variable
5.  Refresh the Variable ‘ Check ‘
6. Check if there are still  scenarios of the Interfaces  to be processed or not. If so Next step , else Exit .
7. Increment the Loop by 1.

The Package Flow is shows below in this Image.
image

ODI Procedure to get list of scenarios.

image

DROP TABLE <%=odiRef.getInfo(“DEST_WORK_SCHEMA”)%>.SCENARIOS

CREATE TABLE <%=odiRef.getInfo(“DEST_WORK_SCHEMA”)%>.SCENARIOS
(S_NO NUMBER(3),SCEN_NAME VARCHAR2(50))

INSERT ALL
INTO  <%=odiRef.getInfo(“DEST_WORK_SCHEMA”)%>.SCENARIOS  VALUES (1,’AGE_GROUP’)
INTO  <%=odiRef.getInfo(“DEST_WORK_SCHEMA”)%>.SCENARIOS  VALUES (2,’FILE_FLOW’)
INTO  <%=odiRef.getInfo(“DEST_WORK_SCHEMA”)%>.SCENARIOS  VALUES (3,’FILE_LIST’)
SELECT * FROM DUAL

Variable  #GET_SCENARIO

image

For Scenario Name i have used the  #GET_SCENARIO  so i get the value of the next scenario to be processed

GET _SCENARIO VARIABLE QUERY

Here iam getting the values of the scen_name from the temp table created using ODI_procedure as mentioned above.

SELECT SCEN_NAME FROM <%=odiRef.getInfo(“DEST_WORK_SCHEMA”)%>.SCENARIOS
WHERE S_NO=#LOOP

CHECK VARIABLE QUERY

Here iam checking at every step if there is any other Scenario left out to be processed or not.

SELECT COUNT(*)-#LOOP  FROM  <%=odiRef.getInfo(“DEST_WORK_SCHEMA”)%>.SCENARIOS

[ Note – Please see my post – Multiple File – single Interface on variable usage and options ,and my Post Generating Multiple Scenarios on how to generate multiple scenarios for Interfaces ]

September 13, 2009
by kdevendr
9 Comments

Categories: Logic , ODI , Tips and Tricks

Single Post View


Multiple Files – Single Interface

Some time you want to update a single table from different Flat File Sources.

This post shows how to carry out such logic with the assumption all the file are stored in a single directory and they all have the same structure and file formatting.

I have implemented this using two option

1. Using a Temp Data store

2. Using Procedure.

Variable Used

LOOP USED TO ASSIGN AND INCREMENT  NO OF TIME FLOW HAS TO BE PROCESSED
GET_INTERFACE SOURCE FILE TO BE PROCESSED BY INTERFACE
CHECK USED TO CHECK WHETHER ALL FILES ARE PROCESSED OR NOT AT EVERY LOOP

All the variable are Alphanumeric and Historize property.

Using Temp Data store

Temporary Interface – FILE_LIST

Get the list of files in the Temporary Datastore  in Work schema, so that we can process Interface sequentially based on the list of files.

image

Next Step is to Assign the variable  ‘ LOOP ‘ = 0 (Zero )

image

image

Next Step is to get the File Name to be processed the Interface . Refresh the Variable.

image

image

image

Apply the required query so it fetches the next record in the loop.

Here iam getting the ‘ File name ‘ to be processed based on the Loop Number so the First loop will fetch the First file , second loop next file and  keep doing so for others.

SELECT  FILE_NAME FROM <%=odiRef.getInfo(“DEST_WORK_SCHEMA”)%>.FILE_LIST
WHERE S_NO=#LOOP

The Next step is to use that File and process the Interface. Here in the Model i have used the  ‘ Resource Name – #GET_INTEFACE ‘ as i want to get  the right file for processing.

image

image

image

Next Step is to Refresh the Variable ‘ Check ‘ ,which checks if all the interface is been processed or not.

image

image

In this Step iam checking whether all the interface is been processed or not.

image

image

The logic is pretty simple to subtract the Loop value from the Total count , so if i have  10 files  in the first loop i would have

Count(*) = 10

Loop        = 1 so remaining interface 10-1 =9 to be process and when its Zero i stop the Flow .

SELECT COUNT(*)-#LOOP  FROM  <%=odiRef.getInfo(“DEST_WORK_SCHEMA”)%>.FILE_LIST

Next Step is to increment the Value of  ‘ LOOP’  as there are still interface to be processed.

image

image

This is summary of  the overall flow.

1. Get the File list into the Temporpary Datastore ( ‘FILE_LIST’)
2. Assign the Loop to Zero
3. Get the Next File to processed.
4. Process the Interface by passing the value from #GET_INTERFACE  variable
5.  Refresh the Variable Check
6. Check if there are still  Files to be processed or not. If so Next step , else Exit .
7. Increment the Loop by 1.

image

Using ODI Procedure

You can perform the above logic , using an ODI Procedure , instead of a temporary datastore.

I personally would prefer this method as its easy to maintain and modify when required.

The steps are very simple and as follows.

1. Drop the Temporary Table.
2. Create the Temporary table in the Work Schema.
3. Insert the Required File and Values.

image

image

image

DROP TABLE <%=odiRef.getInfo(“DEST_WORK_SCHEMA”)%>.FILE_LIST

image

CREATE TABLE <%=odiRef.getInfo(“DEST_WORK_SCHEMA”)%>.FILE_LIST
(S_NO NUMBER(3),
FILE_NAME VARCHAR2(50))

image

INSERT ALL
INTO  <%=odiRef.getInfo(“DEST_WORK_SCHEMA”)%>.FILE_LIST VALUES (1,’FILE1.TXT’)
INTO  <%=odiRef.getInfo(“DEST_WORK_SCHEMA”)%>.FILE_LIST VALUES (2,’FILE2.TXT’)
INTO  <%=odiRef.getInfo(“DEST_WORK_SCHEMA”)%>.FILE_LIST VALUES (3,’FILE3.TXT’)
SELECT * FROM dual

image

[ Note : Please note its a best practise to use a  unique work_schema and use in all the Physical schema defination . I have used a common work_schema called ‘ WORK_SCHEMA’  , so when i create all the temporary data store or procedure they are all in the Temporary work schema ‘ WORK_SCHEMA’ . The other good point will be that if any error occurs during the Interface  and due to some reason the temporary objects like C$_,I$_ etc dont get dropped and they will be seen in the main table.]

September 10, 2009
by kdevendr
15 Comments

Categories: ODI

Tags: ,

Single Post View


Sequence

Database Sequence

Create a database Sequence in Oracle.

create sequence test_sequence
minvalue 2
maxvalue 999
start with 2
increment by 2

Map your interface

image

Call the sequence in the respective column using this format

<SCHEMA_NAME>.<SEQUENCE_NAME>.NEXTVAL

TEMP.TEST_SEQUENCE.NEXTVAL

TEMP                    –  SCHEMA_NAME

TEST_SEQUENCE   –   SEQUENCE_NAME

  • Map it to  ‘Target
  • Use ‘Insert’ only Option

image

run your interface and check for data.

image

ODI Sequence

Create an ODI sequence with the required option

image

Map the column and the sequence with the ODI_SEQUENCE as

:ODI_SEQ_NEXTVAL

:<COLON>_<ODI_SEQUENCE>_NEXTVAL

image

  • Map it to  ‘Target
  • Use ‘Insert’ only Option
  • IKM SQL TO SQL APPEND  ( for Row by Row processing)

run the interface and check for the data

image

September 9, 2009
by Cezar Santos
3 Comments

Categories: Common Errors , ODI , Tips and Tricks

Tags: , , , , , , ,

Single Post View


How to get a constant or pseudo-column from source mapping

Hi,

Let me show you a small trick when is necesary to obtain some psedo-column (like rowid) or database function (like sysdate) .

If a direct mapping of those values is done, a error like this will happens:

If you try to create a source mapping to SYSDATE an error like this one will be raised

If you try to create a source mapping to SYSDATE an error like this one will be raised

For bypass this situation, a small trick could be used.

It is: just add ANY column from source table and comment it. From our previous example (image), it will look like:

sysdate /*SNP_COL.I_COL*/

Now no error is raise, note that no RED indicator exists at mapping.

Now no error is raised, note that no RED indicator exists at mapping.

That is all, just a small trick very usefull to mapping values from source that has no relation with a source column.

A query, a sequence, a function, any of this could be used with this technique.

See you all in the next post my friends!

Cezar Santos

September 6, 2009
by kdevendr
0 comments

Categories: ODI , Tips and Tricks

Single Post View


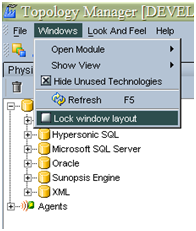
Lock Windows Layout

To Lock the Windows Layout in Designer, Operator, Topology and Security Manager from moving  , check mark option " Lock windows Layout "

Topology – > Windows – > Lock Windows Layout .

September 6, 2009
by kdevendr
2 Comments

Categories: ODI , Tips and Tricks

Single Post View


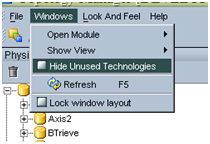
Hide Unused Technologies

To see only the list of Technologies used in Topology and Designer , check mark option " Hide Unused Technologies "

Topology – > Windows -> Hide Unused Technologies