To have the Tab at the Top in Designer, Operator, Topology and Security Manager , check mark option " Tab at the Top "
Topology – > Windows -> Tab at the Top
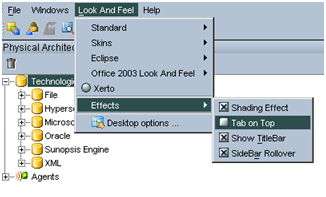
Revert back the option to have Tab at the Bottom .


To have the Tab at the Top in Designer, Operator, Topology and Security Manager , check mark option " Tab at the Top "
Topology – > Windows -> Tab at the Top
Revert back the option to have Tab at the Bottom .
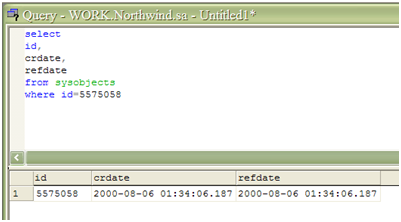
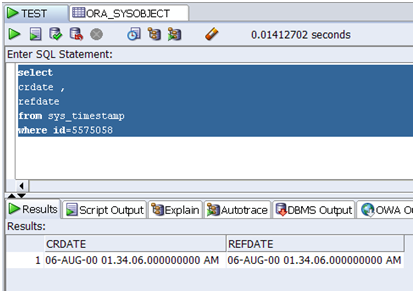
When loading the data for ODI 10g and using the Oracle 10g driver , For columns with "DATE" data type, only the date is captured and the hours, minutes , second are marked as 00.00.00 or Not shown at all.
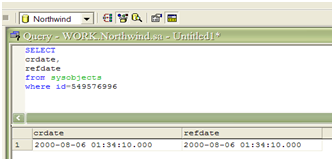
In oracle the data will be without hour , minutes and Seconds.
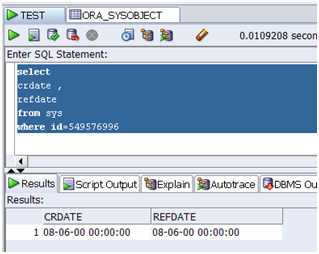
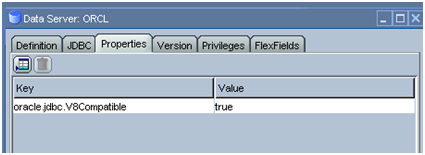
To capture this enable a jdbc property called oracle.jdbc.v8compatible , under the Data Server of the Oracle
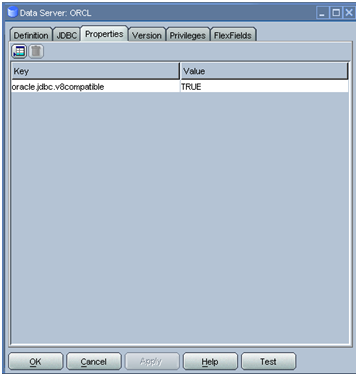
Now check for the data of Date columns, hours, minutes and second will be captured by rerunning the Interfaces again.

There is a known issue related to Enabling this option
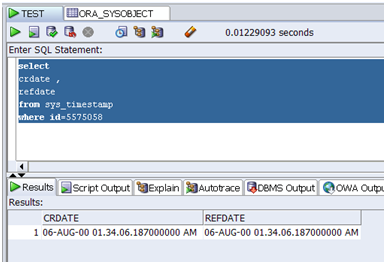
When using Timestamp as datatype, Milliseconds are suppressed with zeroes i.e. all the data will be 01-jul-09 03:06:23.000 for correct data (source) 01-jul-09 03:06:23.234.
2. To solve this issue, make a duplicate of the above Data server where you have enabled the v8compatible option to be true. Delete the option or mark it as False in it .
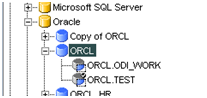
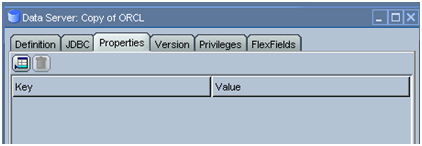
Link your Physical and Logical Scheme to the new (Duplicate) Server and Re Run the interfaces. Look for the Data Now all the Milliseconds will be captured with exact precision
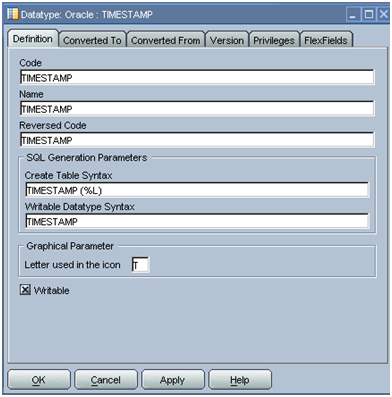
[ Note : There is known issues with ODI 3.4 and 3.5 where the writable Timestamp is entered wrong as ‘ TIMESTAMP( %L ) ‘ , as when ODI create work table it creates as TIMESTAMP (11) which would fail the interface and show an error .
The solution is remove the ( % L ) so the correct writable Data type Syntax is
TIMESTAMP ]
The other best solution for oracle.jdbc.V8Compatible is to use oracle 11g JDBC drivers.
http://www.oracle.com/technology/software/tech/java/sqlj_jdbc/htdocs/jdbc_111060.html
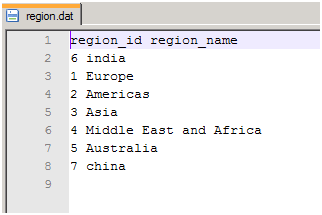
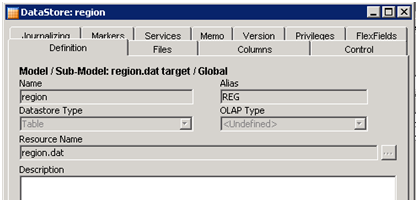
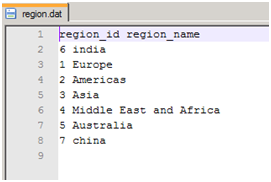
This is the Sample of source Table to be populated as Flat File.

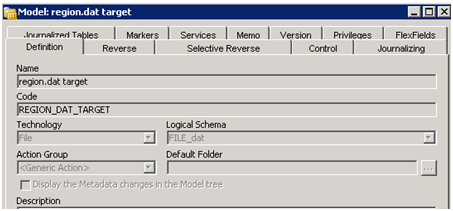
Target [Flat File – region.dat]
1. Go to the Physical architecture of the Topology and insert a New Data Server under File Technology
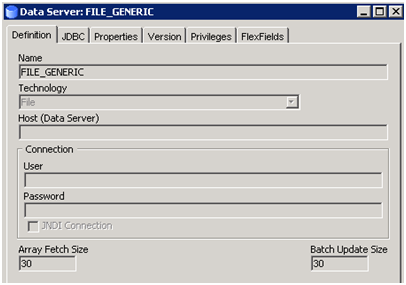
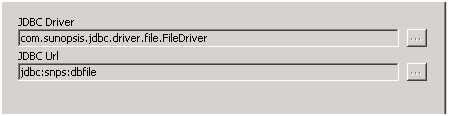
2. For the JDBC Driver choose the " Sunopsis File JDBC Driver "
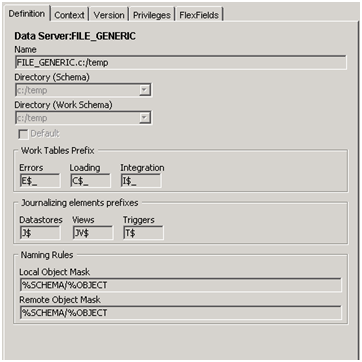
3. Define Physical schema by entering the Directory as shown in the image for Windows or define the Directory path of the Unix environment. ( Make sure your agent should be having permission for that folder and file )
For windows enter the path with " /" even though windows shows directory with " "
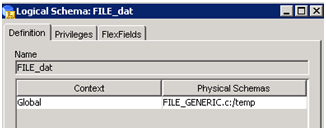
4. Link to the Logical Schema
5. Define your Target model with the required Logical Schema defined above .
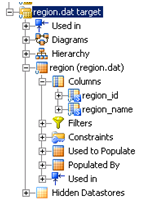
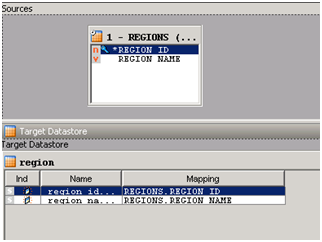
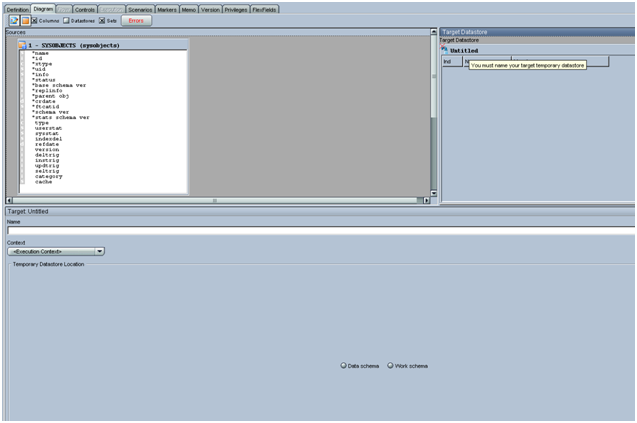
6. Next Step is to define the columns and make sure all the data types are defined as string even for dates.
7. Comparing to the source , I have defined Target as with Two columns region_id and region_name with data type string.
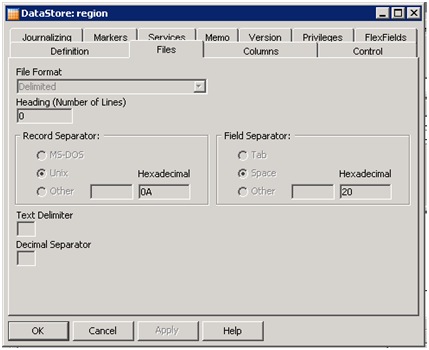
8. Next step is to define the Properties of the File to be populated.
( Note – The most important part of File property is how we define them i.e how the Records are stored and how ODI can categorize Columns while reading from the File ]
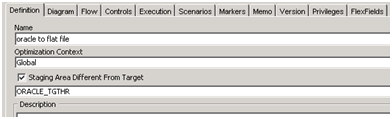
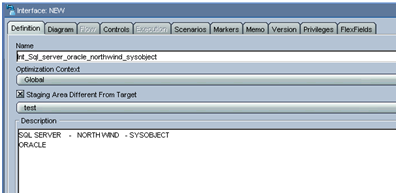
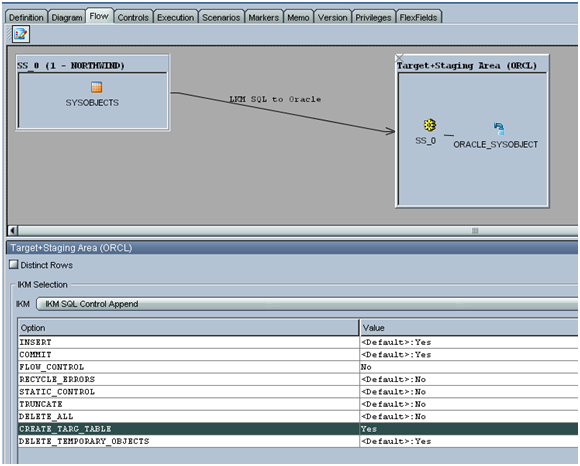
9. Next step is to define the Interface , since our target is a File we have to check mark the option " Staging area different from target " and selecting either the source or other schema which you want to use as the Staging schema , but preferably Source Schema.
10. Select the required LKM if the staging is different from the Source and " IKM Sql to File Append" . Apply and Execute .
11. Enable the option " GENERATE_HEADER " if you wish to populate the data with Headers.
12. Finally your file is created with the data and headers in it.
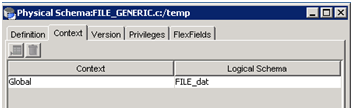
[Tip : – If you wish not to create a new data server for File Technology , you can use the default data server " FILE GENERIC " , the path is to store and create file under FILE_GENERIC is ‘ ODI_HOMEoracledidemofile ‘ . ]
Start the agent using agent scheduler or agent service
Scheduling process
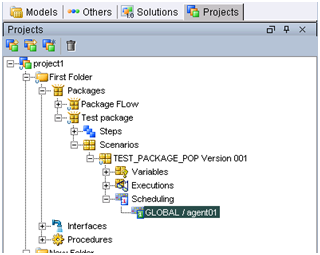
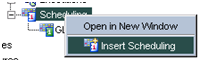
Under the scenario , right click on scheduling , click on " Insert scheduling "
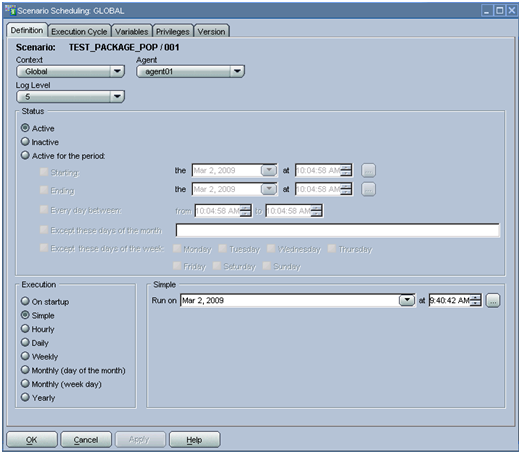
Define all the scheduling parameter and the logical agent and log level. Set the Execution mode and Execution time and period. For more choice look for other tabs.Finally apply your setting and click ok.
To apply Scheduling , Go to Topology – > Logical Architecture – > Logical Agent
Right click on Logical Agent and Click on the " Update Scheduling " .
[ Note: Make sure the agent is running as ODI scheduler needs the agent for its functionality . ]
This error occurs when you have multiple schemas but no default schema defined.
Go to Topology – > Physical Architecture – > Technology – > Data Server .
Edit the physical server that you want to be the default and under the Definition, there is a check box "Default" ,check mark it and rerun the Interface.
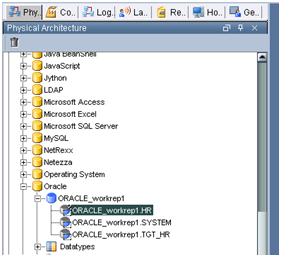
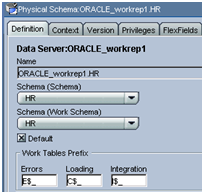
Mark the correct physical schema to default and rerun the Interface.
September 6, 2009
by Cezar Santos
15 Comments
Categories: How to , ODI , Tips and Tricks
Tags: INTERFACES , ODI , ODI Experts , Oracle Data Integrator

In ODI , reports can be generated in Designer and Topology about Packages , Interfaces , Procedures ,Physical and Logical architecture and other option…

Right click on Folder and select print –> Interfaces , Procedures ,Packages and Folder .
Select the folder and PDF report about the respective object will be generated.

To print Knowledge Module , Right Click on the Project – > Print – > Print Knowledge Module

Reports for Physical , Logical and Context information can be printed from Topology.
Right Click File –>Print

File -> Export –> Technical Environment .

Respective CSV file will be generated containing all the Technical Information about the
Master , Work and Technologies registered in the Topology.

Go to Designer –> File –> User Parameters

Look for the option “ Default PDF generation directory “ and in Value column “Browse to the required folder and click ok “
From now on when you click Print <object> automatically it will be created in the respective default directory .
Sample of the Excel file to be populated in Oracle.

2. Set up the odbc connection to excel file through
Control panel -> administrative tools – >Data source (odbc) (Windows )


3. Use the JDBC – ODBC BRIDGE DRIVER in the put the ‘odbc’ name defined above (for this example its ‘detail’) in the URL as show below in ODI

4. Define your Physical and Logical Schema

5. Link it to logical schema

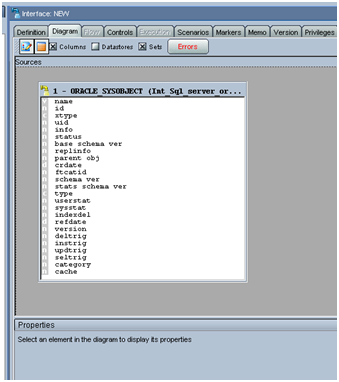
6. Create a model and using a selective reverse and do the revere engineering

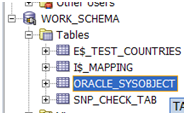
7. Finally all the selected tables with be visible as the data store as shown below

8. Right click to see the data, to check everything is fine

[ Note: The above procedure can be used to connect to Microsoft Access. Set up the ODBC connection using the Access driver and use the above process to set up the connection to Microsoft Access ]
This part of the Post is update on 20 – jun – 2010 in order to cover the few issue related to reading and avoiding unnecessary null Rows .
For some of the Excel files , the sheets don’t appear if you select ‘ Tables’ , we need to select ‘ System Tables ‘


Removing Unnecessary Null Rows

Due to space between the Main Header and the data , the space rows is captured as you can see in the below screenshot.

to remove this just put a Filter condition

and you will not have any more space being captured
[Note : please use the column which is unique and is like a primary id , since using a wrong column can lead to Filter of Correct Data ]

Removal of Extra Header
Some time we have header being in First few lines and they are visible in the data to remove that just use a simple Filter condition

Here i am trying to remove the unnecessary Header called base from the data , just use a simple query with column_name !=’string to be removed’

September 1, 2009
by kdevendr
12 Comments
Categories: How to , Knowledge Modules , Logic , ODI
Tags: KM , Knowledge Modules
Go to Designer – > Project – > Knowledge Modules – > Import Knowledge Modules

Go to File Import directory … orahome_1oraclediimpexp ( windows )

Select the Complete List or a particular Knowledge Module to be imported and will be visible under the respective KM category.
[ This tutorial explain how to create Master and Work Repository in Unix and windows environment with Oracle 11g with ODI_MASTER and ODI_WORK defined as Master and Work Repository .
Please change the parameter for your environment and database ]
Oracle recommends creating ‘snpm’ and ‘snpw’ for Master and Work Repository. I intend to use ODI_MASTER and ODI_WORK as it makes it easy and sense when any one looks into it.
After Oracle Data Integrator ( ODI) Installation, create these schemas as follows namely.
| SCHEMA NAME | PASSWORD | DESCRIPTION |
| ODI_MASTER | ODI_MASTER | Schema to Install the Master Repository |
| ODI_WORK | ODI_WORK | Schema to Install the Work Repository |
| WORK_SCHEMA | WORK_SCHEMA | Schema to be used as Work schema for all the Oracle Connection |
CREATE USER ODI_MASTER IDENTIFIED BY  ODI_MASTER;
GRANT CONNECT,RESOURCE TO ODI_MASTER;
CREATE USER ODI_WORK IDENTIFIED BY  ODI_WORK;
GRANT CONNECT,RESOURCE TO ODI_WORK;
CREATE USER WORK_SCHEMA IDENTIFIED BY WORK_SCHEMA;
GRANT CONNECT,RESOURCE TO WORK_SCHEMA;
In UNIX environment please use the following environment variables to connect to the ODI Installed Folder
export ODI_HOME=/home/oracle/OraHome/oracledi
export ODI_JAVA_HOME=/home/oracle/OraHome/jre/1.4.2
export PATH=$PATH:$ODI_HOME/bin
cd /home/oracle/OraHome/oracledi/bin
[Note: Please change your HOME PATH i.e /home/oracle to your installed directory where ODI is installed ( as it is for me ) ]
Creating Master Repository

In Windows Go the Following path as shows in the above image or you can call the ” REPCREATE.BAT ” in windows from the cmd prompt or ” ./repcreate.sh ”
in UNIX environment from ‘ oracledi/bin ‘ folder

Enter the required information to create the Master Repository.
User – Username to connect to the database, for my example I am using “ODI_MASTER”
Pass – Password for the particular above mentioned user.
Id – Give any number from 0 -50
Password –for my example its ODI_MASTER
Technology – Use the technology you are using above to connect, for my example I am selecting Oracle.
Driver : Click and select your respective technology jdbc driver , for my example its ‘ oracle ‘ so I am using
Oracle.jdbc.driver.oracleDriver

You can learn about each driver in Description as you scroll through all the drives listed there .
URL : Enter the corresponding url for respective driver technology , for my example iam using ‘ localhost.localdomain:1521:orcl ‘
host address – localhost.localdomain
port – 1521
Sid – ORCL
Change your parameters depending on your environment.
To learn about url see Description in the image.

Final click on Test connection, if every parameter is correct it will show Successful message.

Click on and Master Repository will be created .
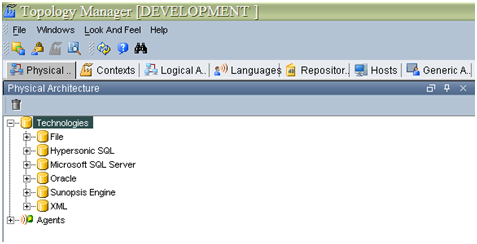
Logging into Topology Manager
Now type ‘ ./topology.sh ‘ or ‘ TOPOLOGY.BAT ‘ in the oracldi/bin directory or point to the icon of the Topology as show in the image.

To login into Topology Manager and you will see a similar screen , click on new shown below

Type in the required parameters , generally the parameters are same as above
For me (oracle ) its like this

For Oracle Data Integrator Connection
Give a login name i.e a name for your Repository, you can give any meaningful description eg development, testing etc.
USER – SUPERVISOR
PASSWORD – SUNOPSIS
[ ** Please use capital alphabets , they are case sensitive ***]
For Database Connection (Master Repository)
Use the same User and password that you have used while creating Master Repository as discussed above while creating master repository .
Finally click Test to test the connection .Click ok and type again ./topology.sh
After logging in, select your login name and click ok.

Now you will logged in the Topology Manager , go to fifth tab i.e Repositories and you will see Master and Work Repositories as shown below.

Creating Work Repository
Right Click on Work Repositories and click on “Insert Work Repository”

You will see a Data Server , as shown below ,

Name : Name for your Work repository , it can be anything
Technology : Technology you are using to connect , for my example its Oracle
User : Username for the database ( ODI_WORK)
Password : Password for the particular above mentioned user
Let the other default parameters be as it is .
Go to Next Tab JDBC
Give the JDBC Driver and JDBC Url depending on your technology.
Click on Test to test the connection .

Click yes and if everything is correct you will see

Else connection failed , if failed please check your parameters.
Finally a window will pop up , enter the
ID for the Work Repository and the meaningful Work Repository Name to it.

Finally you will see the Work Repository defined as shown below in the sample image.

Connecting to the Designer.
Now we are going to connect to the above Work repository and do our development.
Type in the terminal ./designer.sh
or
designer.bat
Click on New and type in the following parameters

Enter the same information and the only thing new is Repository Name type in the above work repository if you remember, else click on this icon under Work Repository box.
You will see a list of the Work Repository you created

Select and click ok
Test the connection , if everything is fine you will have successful connection

Later select your new Login Repository creates above and automatically username and password will be entered.

Click ok and you will log into the Designer to create your First interface.
Learn more about it from Getting Started guide from Oracle